Last Updated on by Azib Yaqoob
Recently I changed the design of this website. I used the One-Click SiteGround staging environment to develop this website. So, in this tutorial, I will show you how you can also set up the Siteground staging. Using SiteGround’s Staging tool, anyone can quickly set up a staging environment. Let me show you how.
First Things First: What is a Staging Environment?
If you are new to web development, this may look like an alien term. So, Let me explain. The web development process goes through several stages before making a website live. A web development workflow usually looks like this:
Local: When you work on your computer (localhost) to create/code the website. It means you are hosting this website on your computer. It is faster to load, and you don’t need an Internet connection to test it.
Staging: This is where you test the developed website for its complete functionality before deploying it live. Also, it is an excellent way to show your clients or stakeholders recently implemented changes.
Production: This is where your actual website exists. Anyone with an active Internet connection can access it. You don’t want to modify the live website because things could go wrong, and your site could go down. So, always avoid the production environment to deploy significant changes.
Why Should You Use a Staging Environment?
A staging environment is a clone of your live website. You can easily test new major features using a staging environment. Most web developers use the staging environment as a testing ground; it prevents issues from occurring on the live website.
What is One-Click SiteGround Staging Environment?
To create and manage development copies of your website, you can use the SiteGround staging tool. It is an excellent tool for people with no prior coding experience or new web developers. Also, it will save you a lot of time.
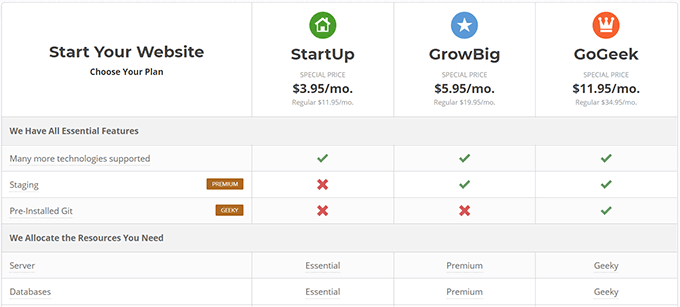
Note: One-Click SiteGround Staging is only available to GrowBig and GoGeek Plan users. And it only works if you are using either Joomla or WordPress.
How to Setup SiteGround Staging Environment?
You can find the Staging Tool in the cPanel on SiteGround GrowBig or GoGeek plans. Here’s how to access and make a staging copy of your live website:

Step 1: Log in to your SiteGround hosting Dashboard. Go to My Account, then click on the “Go to Cpanel” button.
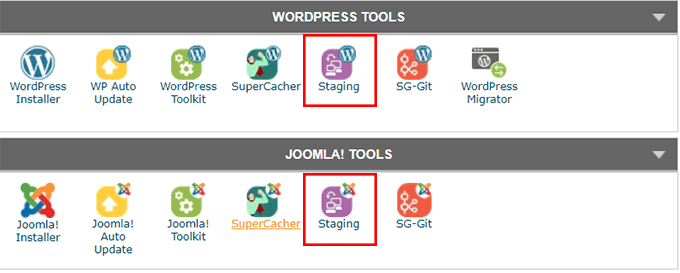
Step 2: You will find a new page with many options and tools. Scroll down and look for WordPress Tools and Joomla Tools. Pick a platform you are using and click on the “Staging” button.
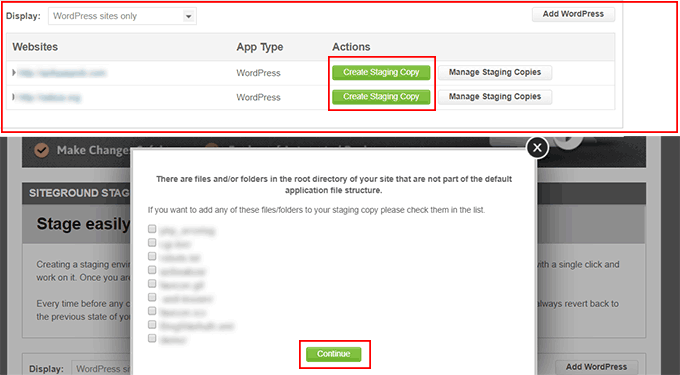
Step 3: You will find all the domain names hosted on SiteGround. Click on the button “Create Staging Copy.” It might show you some root directory folders and files which are not part of the standard WordPress install—select files and directories which are essential. Click on the “Continue” button.
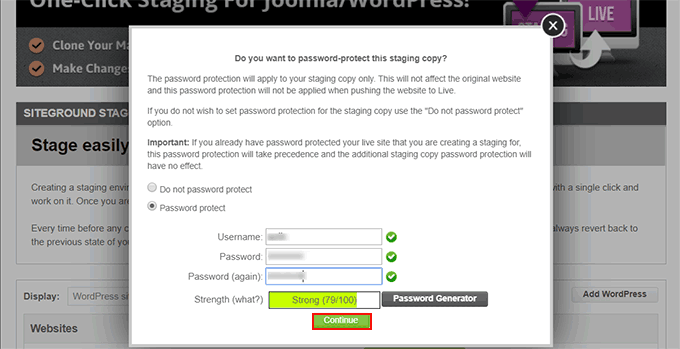
Step 4: Now, it will ask you to use password protection for this staging copy. Create a password and change the username to something memorable. Click on the “Continue” button.
Note: I would strongly recommend that you use password protection so search engines such as Google, Bing, and DuckDuckGo won’t be able to crawl and index your staging copy.
Step 5: It will generate a staging copy of your live website. Now you can access it by clicking on the “Admin Panel” button. It will ask you to enter the username and password we set up in the last step. Enter those details and press enter. It will redirect you to the staging WordPress login area. Please note down the URL so you can access and work on the website.
Deploy from SiteGround Staging to Live Website
After testing, you can use SiteGound Staging to deploy the website live. Your site will move from Staging to live along with all the changes.
Click the Push to Live button from the staging environment page.
There are two options to push your staging copy to your live site.
It will display two different options Full Deploy and Custom Deploy. Let me explain what each of these options will do.
1. Full Deploy
If you click the Full Deploy button, your staging copy and database files will overwrite your live site. For example, this option is suitable if you don’t have something specific to deploy on your live website.
2. Custom Deploy
You can use the Custom Deploy option to deploy specific database files to a live website. When you press this button, Siteground will display all the database files from your staging environment, and you can control to add or remove them.
Destroy SiteGround Staging Copy
Similarly, you can delete this staging copy when you are done by going to cPanel > Staging > Manage Staging Copies > Destroy.
If you push the staging copy to the live website and somehow things don’t go as expected, you can always restore a backup. SiteGround and many web hosting services have easy backup and restoration services.
When you push the staging copy live, You can access that by going to cPanel > Staging > Manage Staging> Restore Backup.
I hope you found this helpful post. If you are using SiteGround, check out this post to reduce server response time on SiteGround hosting.

