Last Updated on by Azib Yaqoob
Want to set up Google Analytics to track your website traffic? Here is a step-by-step tutorial on how to add Google Analytics tracking code to your WordPress, Shopify, or Wix website. Please follow these instructions to set up Google Analytics.
First, we will create a website property on Google analytics. After that, We will add a Google Analytics tracking code in Wix, Shopify, and WordPress.
Note: You can also use Google Tag Manager to Add Google Analytics to your website.
Page Contents
How to Set up Google Analytics Website Property
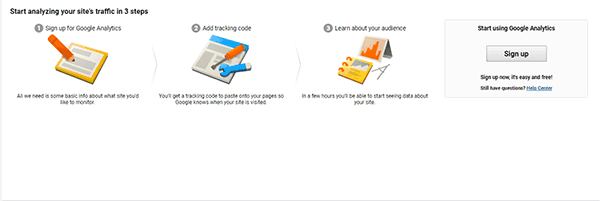
Step 1: Visit the Google Analytics website here. If you have a Google account, then click on Sign in. If you do not have a Google account, you can create an account by clicking on ‘Create an account’. After signing in to your Google account, click on ‘Access Google Analytics’. From there, Click on the ‘Sign up’ button.

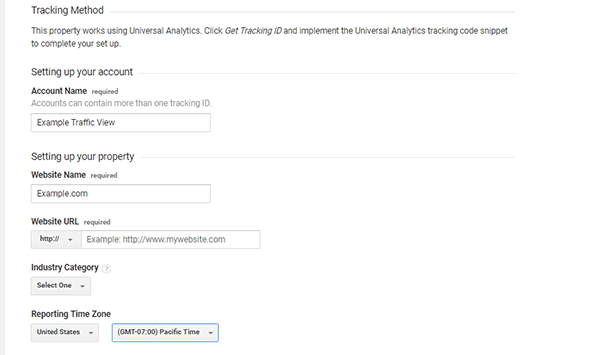
Step 2: Select a Tracking method to ‘Website’ and add an ‘Account Name’ to give it an identity. After that, add your ‘Website Name’ to remember this property. Next, you need to add your Website URL. Use the same URL that your website visitors will see. Select HTTP or HTTPS, which one you are using on the site.

Step 3: Select a category from the list in ‘Industry Category’ closely related to your website niche. Next, select a Reporting Time Zone. This should be a Time Zone where you are located. Google Analytics will report data according to your local time.
Step 4: After reading the terms and conditions, click on the Get Tracking ID button. Copy the provided code from the text box. We will use this code in the next step of this tutorial.
How to Setup Google Analytics in Wix
Adding Google Analytics may sound complex, but it’s pretty straightforward. Follow these steps to add a Google Analytics tracking code to your Wix website.
Step 1: Log in to your Wix website, then go to your site’s dashboard.

Step 2: Click the Marketing & SEO from the left sidebar, and in the drop-down menu, select Marketing Integrations. Click Connect under Google Analytics.
Step 3: Click the Add Google Analytics ID button on the next page. Paste your Analytics tracking code.
If you want to improve your Wix site traffic, check out these Wix SEO tips. Also, if you are tired of Wix, you can move your Wix website to WordPress.
How to Setup Google Analytics in Shopify
To track the traffic of your Shopify store, you must use Google Analytics. It will provide information about your website audience, their interests, their actions on the site, bounce rate, and more. Here’s how you can add a Google Analytics tracking code to your Shopify website.
Step 1: Log in to your Shopify store and go to Online Store. Inside your store dashboard, Click Preference in the left-side link navigation.
Step 2: Scroll down to Google Analytics. Now copy the tracking code from Google Analytics and paste it here. Click Save.
How to Setup Google Analytics in WordPress
You can add Google Analytics tracking code to your WordPress website with the Google’s Site Kit plugin.
Step 1: I hope you have created your website property on Google Analytics in the first step of this article. Now, log in to your WordPress website admin area. Click on Plugins > Add New.
Step 2: Now search for this plugin, ‘Site Kit’. Click on the button ‘Install’, wait for a few seconds, then press the activate button.
Step 3: Go to Site Kit > Dashboard to set up Site Kit.
Step 4: Click Sign In with Google to proceed with setup. Select the account that you used to create the Analytics property.
Step 5: Follow on-screen instructions to set up Google Analytics on your site.
Google Analytics provides excellent functionality and insight for driving your business to success. Using Analytics reports to make sound decisions is critical for business sustainability and growth. I hope you find this tutorial helpful. If you want to boost your WordPress website traffic, check out my beginner’s friendly WordPress SEO guide.

