Last Updated on by Azib Yaqoob
If you want to migrate your website from Wix to WordPress, you will find this tutorial helpful. I will show you exactly how to transfer from Wix to WordPress without losing its ranking. It might sounds like a difficult task but believe me it is much simple.
I suggest you carefully plan out the whole Wix to WordPress migration process. If you are unsure about it then you should do your research before starting the process. If website development and SEO are not your strong suit, you should consider hiring a professional.
Table of Contents
Benefits of Moving from Wix to WordPress
Well, if you are reading this post, the chances are you have already made up your mind. If you need more convincing, then here are some of the benefits of migrating from Wix to WordPress:
- Compared to Wix, WordPress is quite an SEO-friendly platform. You can install dedicated SEO plugins like Rank Math or Yoast for better search ranking.
- WordPress is an Open Source website builder, and Wix is a closed-source platform.
- WordPress is accessible as a content management system, and Wix is not.
- You have control over everything on WordPress.
- WordPress offers thousands of free plugins and themes
How to Migrate from Wix to WordPress?
Without further ado, let’s get started the migrating process:
Step 1: Purchase a Domain and Hosting
Wix host the website on its servers. So, if you want to migrate your website from Wix, you must buy a separate hosting service to host your domain. Also, if you don’t have a domain name, you have to register one.
You can find reliable and cheap hosting and domains from NameCheap, Hostinger, or Godaddy.
When you are purchasing a hosting plan, make sure that it can tackle your site’s traffic needs.
Once you buy hosting, you must transfer your domain name from Wix to your hosting service.
Here’s how you can transfer your domain from Wix:
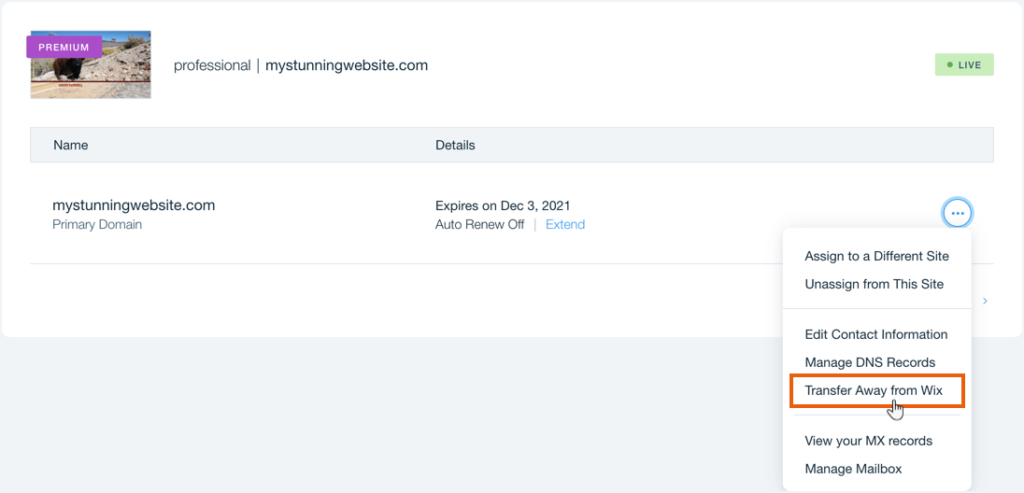
- Login to Wix and go to the My Domains page.
- Select the relevant domain if you have multiple domains hosted with Wix.
- Click the Advanced tab.
- Press the button Transfer away from Wix
- Click Send Code
Step 2: Install WordPress
Currently, there is no official Wix migration solution. It seems as if they deliberately made the migration process complex.
Nevertheless, it doesn’t mean that you can’t move it. It is possible. Perhaps a little challenging, but with the help of this tutorial, you can quickly transfer your Wix Website to WordPress.
After buying a new hosting, you need to install WordPress on your site.
Most hosting companies these days provide a one-click WordPress install solution. The exact instructions are different for each hosting platform but, you will find this option close to your hosting Dashboard.
You will find WordPress Installer when you log in to your cPanel. Follow the instructions, if any, which will take a few minutes.
Note: If you can’t locate the one-click WordPress install then contact your hosting provider.
After installing WordPress, you need to copy your Wix website content, images, videos, and blog posts to WordPress.
Let me show you how to download all your website content from Wix.
Step 3: Install a Theme on WordPress
It is super easy to install a theme on WordPress.
You can download free WordPress themes from the WordPress themes directory. I recommend trying the GeneratePress theme, it is super easy and customizable.
If you want well-designed themes and customer support, then you can also purchase a premium WordPress theme from these sites:
Once you have your theme downloaded, log in to your WordPress website by typing domain.com/wp-login.php in your browser. Replace domain.com with your actual domain name.
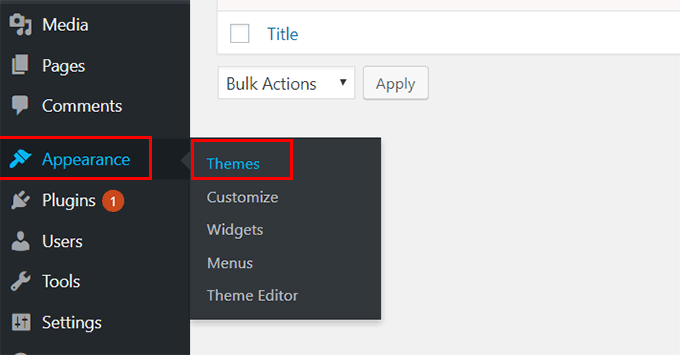
Now, bring your mouse to “Appearance” and click on “Themes.”
On the next page, click on the “Add New” then “Upload” button.
Press the “Choose File” button and select the downloaded theme from your computer.
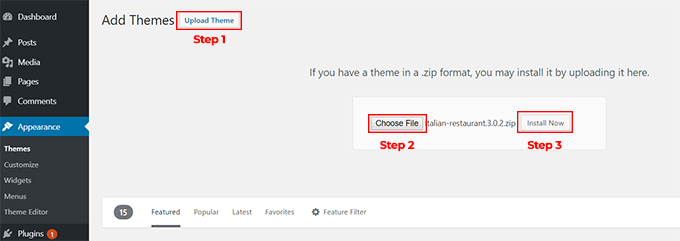
Now, click on the Install button. It will take a few seconds and redirect you to a new page.
Click the Activate button, and your theme is installed on the website.
Step 4: Manually Transfer Pages from Wix to WordPress
You can import blog posts via RSS feed from Wix to WordPress. However, there’s no automated solution to transfer your site pages from Wix to WordPress. So, we need to copy all the existing pages from Wix to WordPress manually.
In WordPress, you can create a page by bringing your mouse to Pages and clicking on the “Add New” button from the sidebar options.
Copy and paste all the content from your Wix pages to WordPress. Once you are done, click on the Publish button.
Step 5: Import Blog Posts from Wix to WordPress
You can quickly move blog posts from Wix to WordPress. Here’s how:
Type your domain, and at the end of your Wix site URL, add /feed.xml. Please see the example below:
or
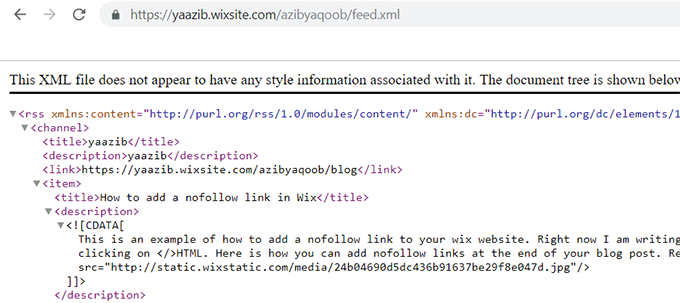
Save the page if you see a page like the above screenshot on any of the feed URLs. Right-click on the page and save to download this XML RSS feed to your computer.
Now, log in to your WordPress admin area. From there, bring your mouse to Tools, then click on the Import button.
Here you will find an RSS import tool. Click on the Install link. Wait for a while, then click on the link Run Importer.
Click the “Choose File” button on the next page and upload the XML file we downloaded earlier. Click on the upload and Import button.
Uploading all your blog posts from Wix to WordPress will take time. However, this tool won’t upload all the images you added to the posts. For that, we can use another method.
Step 6: Import Images from Wix to WordPress
Don’t worry. You don’t need to upload each image individually from Wix to WordPress. In WordPress, you can easily upload blog images by installing the plugin Auto Upload Images.
Log in to your WordPress admin area. Bring your mouse to the Plugins option in the sidebar. And click on the Add New button.
Now, search for this plugin, “Auto Upload Images.”
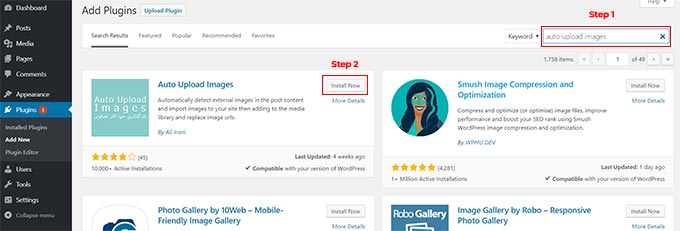
Click on the Install button and wait for a while. Now, click on the Activate button.
Move your mouse over the sidebar on “Settings,” then click on Auto Upload Images. It will open up this plugin setting. Scroll down to the page and press the Save Changes button.
Now, you need to update all your posts and pages which contain those images. Go to posts > All posts. Click on the Screen Options button at the top.
Increase the number of items per page to 999 and click the Apply button. Select all your posts and click on the Edit button under the Bulk Action menu.
Click on Apply, then the Update button.
All your posts will be updated with the images. You can repeat this process to upload images to relevant pages.
Step 7: Redirecting Traffic from Wix to WordPress
Once your migration is complete, redirecting traffic from Wix to WordPress is crucial for ensuring your existing audience can easily find your new site.
Note: Free Wix accounts do not support redirection. If redirection isn’t possible, place a notification on your old Wix site directing visitors to your new WordPress site. If you have a custom URL on Wix to set up a redirect then here’s what you need to do:
var hashesarr = {
"#!about/ghit7”:’/about-us/‘,
"#!contact-us/fe37”:’/contact/',
“#!dog-article/c6hg”:’/dog-article/'
 };
for (var hash in hashesarr) {
    var patt = new RegExp(hash);
    if (window.location.hash.match(patt) !== null) {
        window.location.href = hashesarr[hash];
    }
}
- Customize the redirection code: Utilize the provided JavaScript code snippet to establish redirection rules. Replace the placeholder URLs in the code with the corresponding URLs from your Wix site and their respective WordPress slugs.
- Save the code: Paste the customized code into a text editor like Notepad and save it as “redirects.js”.
- Upload the file: Use a Secure File Transfer Protocol (SFTP) client to upload the “redirects.js” file to the /js/ directory of your WordPress website. If the directory doesn’t exist in your theme, create it.
function wpb_wixjs () {
wp_enqueue_script( 'wixredirect', get_stylesheet_directory_uri() . '/js/redirects.js', array(), '1.0.0', true);
}
add_action('wp_enqueue_scripts', 'wpb_wixjs');
- Edit functions.php: Add the provided function to your theme’s functions.php file. This function enqueues the JavaScript file for redirection.
- Save changes: Save your modifications to functions.php.
- Test the redirection: Visit an old Wix URL to ensure that you and your visitors are redirected to the corresponding pages on your new WordPress site.
Hire me to Migrate from Wix to WordPress
If you find the migration from Wix to WordPress a bit too challenging then please feel free to contact me. I can answer all of your questions regarding the migration process. Also, if this all sounds too difficult for you, you can hire a professional like me.
Once you migrate from Wix to WordPress, you might want to improve WordPress SEO; for that, you can install a plugin such as Yoast SEO. Other than that, here are additional WordPress plugins for SEO that can further help you boost your site ranking.

