Last Updated on by Azib Yaqoob
Are you trying to reduce initial server response time on your WordPress site?
The initial server response time is one of the most important factors that affect website speed. It can cause a bad user experience, and can even affect your search rankings.
In this article, we will discuss ways to easily reduce the initial server response time in WordPress.
What Causes Slow Initial Server Response Time?
Slow initial server response time is caused by your web server settings. If you are using a good hosting provider, there are settings you can tweak to fix the initial server response time.
Here are some of the most common reasons that can cause slow initial server response time:
- Hardware resources: The server’s hardware, such as CPU, RAM, and disk space, can affect response time. Poor hardware or lower resources may increase the server’s time to respond.
- Network connectivity: The speed and quality of the network connection between the server and client can also impact response time. Network congestion, distance, and latency can cause delays.
- Software issues: Issues with the server’s software, such as outdated software, misconfigured settings, or bugs in the code, can also contribute to slow response times.
- Traffic volume: High traffic volumes can overload the server, leading to slower response times.
- Database queries: Slow database queries can also impact response time. Mainly if the server processes many requests at the same time.
To diagnose and address slow initial server response time, it’s essential to carefully review the server’s hardware and software configurations, monitor network connectivity, and optimize code and database queries as necessary.
Fixing Slow Server Response Time in WordPress
Fixing slow server response time in WordPress can be a complex process that requires a combination of strategies. Below are some common solutions that can help you fix the slow server response time in WordPress.
1- Choose a Good Hosting Provider
The first and most important step in reducing the initial server response time is to choose a good hosting provider.
Your hosting provider should have a fast, reliable server, high uptime, and good customer support. A good hosting provider will also offer various hosting plans designed to meet the needs of different types of websites.
2- Use a Content Delivery Network (CDN)
A content delivery network (CDN) is a network of servers that are located around the world. When a user visits your website, the CDN will serve the content from the server that is closest to the user. This can significantly reduce the initial server response time and improve the overall performance of your website.
3- Optimize Your Images
Large images can significantly slow down your website, especially if not optimized for the web.
Make sure to compress images for WordPress and use the correct file format. JPEG is the best file format for photographs, while PNG is best for graphics and illustrations.
4- Minify Your CSS and JavaScript
CSS and JavaScript files are essential for the design and functionality of your website. However, they can also slow down your website.
Make sure to minify your CSS and JavaScript files to reduce their size and improve your website’s performance. Test your site functionality if you minify CSS and JavaScript because it can sometimes mess up the code.
5- Use a Caching Plugin
A WordPress caching plugin can significantly improve the performance of your website by storing frequently accessed data in a cache. This reduces the number of requests to your server and speeds up the initial server response time.
If you have an eCommerce WordPress website then ensure you serve cache for logged-in users.
On WordPress, there are several caching plugins available. I have compared the top ones, please feel free to check them out:
- Comparison between WP Rocket and NitroPack
- Performance case study: WP Super Cache and WP Fastest Cache
6- Poor Quality WordPress Plugins and Themes
Some WordPress plugins or themes may not be using the proper coding standards. For example, they may add too many requests on each page load which could affect your website’s performance.
Similarly, WordPress themes and plugins may load unnecessary JavaScript and CSS files or run unoptimized database queries. This could cause the server to become sluggish and affect its responsiveness.
Only use plugins and themes with good reviews to avoid this problem.
7- Use a Lightweight Theme
A lightweight theme can significantly improve the performance of your website by reducing the amount of code that needs to be loaded. Choose a theme optimized for speed and performance, such as Astra or GeneratePress.
You can create a staging WordPress site and then test different themes. Use speed testing tools like Pingdom or PageSpeed Insights to see which theme gives the best results.
Reducing the initial server response time is essential for improving the performance of your WordPress website. By following these tips, you can significantly reduce the initial server response time and provide a better user experience for your visitors.
The most important factor to help you speed up the website is server-side caching. You can use these methods to ensure your site loads as fast as possible according to your hosting plan.
Fixing Initial Server Response Time on Different Hosting Platforms
Many WordPress hosting companies have their own built-in caching systems. These default caching mechanisms are optimized for their own server software and give you the best chance of reducing the initial server response time.
Here is how to fix slow server response time on top WordPress hosting companies.
Fix Initial Server Response Time on SiteGround
On SiteGround, you can fix the initial server time by following these steps:
To get started, log in to your SiteGround account and navigate to the Speed section of the dashboard. Here, you’ll be able to enable SuperCacher for your website.
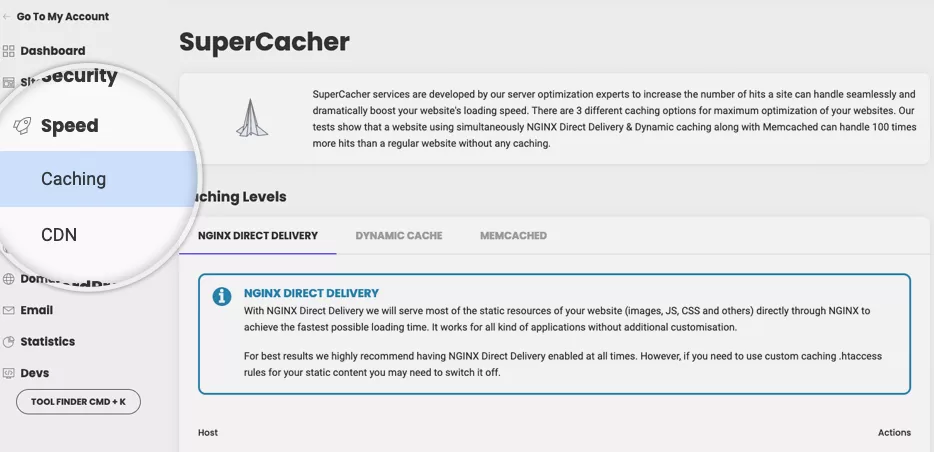
Next, you’ll need to choose a caching method. SiteGround offers three different SuperCacher options:
- Static Cache: This method caches your website’s static content, such as images, CSS files, and JavaScript files.
- Dynamic Cache: This method caches your website’s dynamic content, such as database queries and PHP pages.
- Memcached: This method stores frequently accessed data in memory, retrieving it faster than disk-based caching.
You can choose one or more caching methods depending on your website’s needs.
Configure SuperCacher settings
Once you’ve chosen your caching methods, you can configure additional settings to optimize SuperCacher’s performance. For example, you can specify which URLs should be excluded from caching or set a limit on the size of cached files.
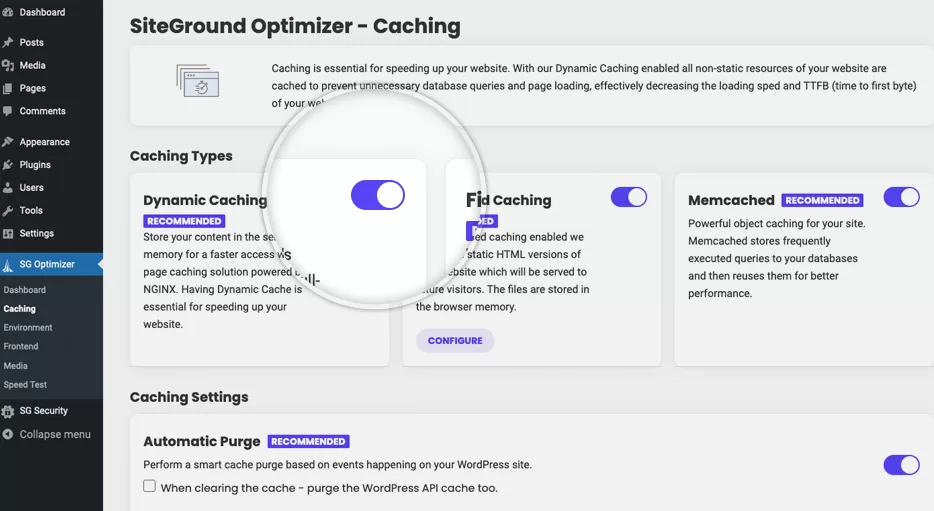
Once you have enabled these settings, install SiteGround’s Optimizer WordPress plugin. You can find this plugin in the WordPress directory.
Fix Initial Server Response Time on Hostinger
Hostinger hosting is a well-known name in the shared hosting space. Hostinger plans include the LiteSpeed Cache pre-installed.
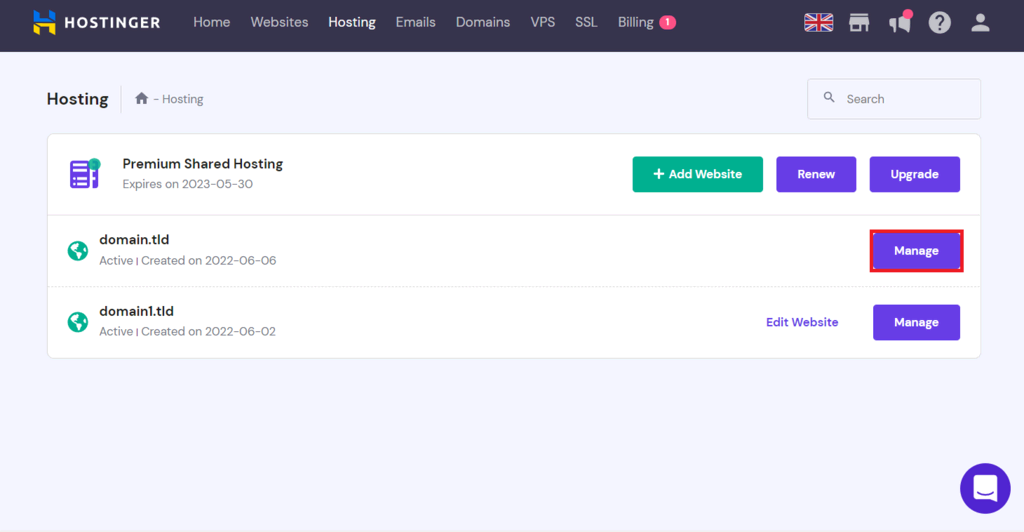
- Log in to your Hostinger hosting account. Access the hPanel (Dashboard) by clicking the Hosting tab.
- Click the Manage button next to the domain you want to enable caching.
- Scroll to the Advanced settings and click Cache Manager.
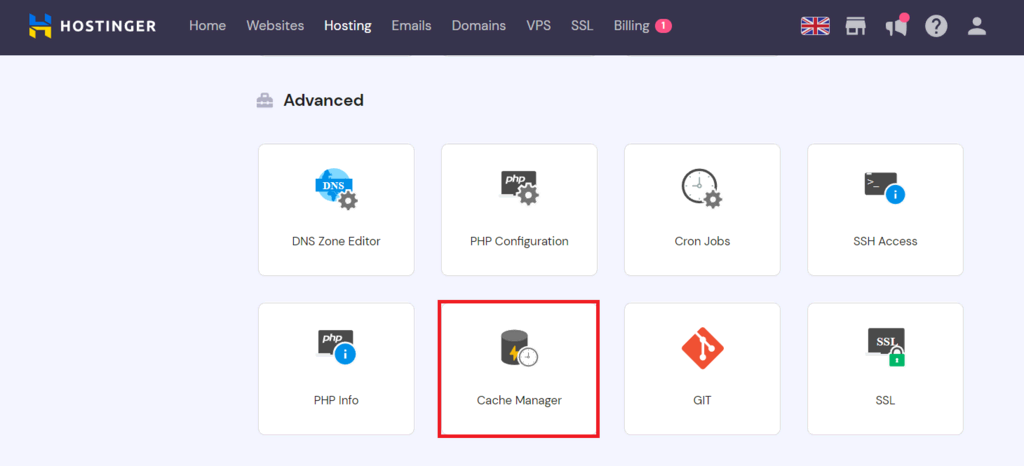
- Enable the Automatic Cache toggle.
Note: When you enable Automatic Cache feature, it automatically renews the cache of your website after every 30 minutes. This feature will enable your site users only see the latest updated version.
After enabling the automatic caching feature, we have to activate the LiteSpeed cache.
- open hPanel and select Overview under the WordPress section.
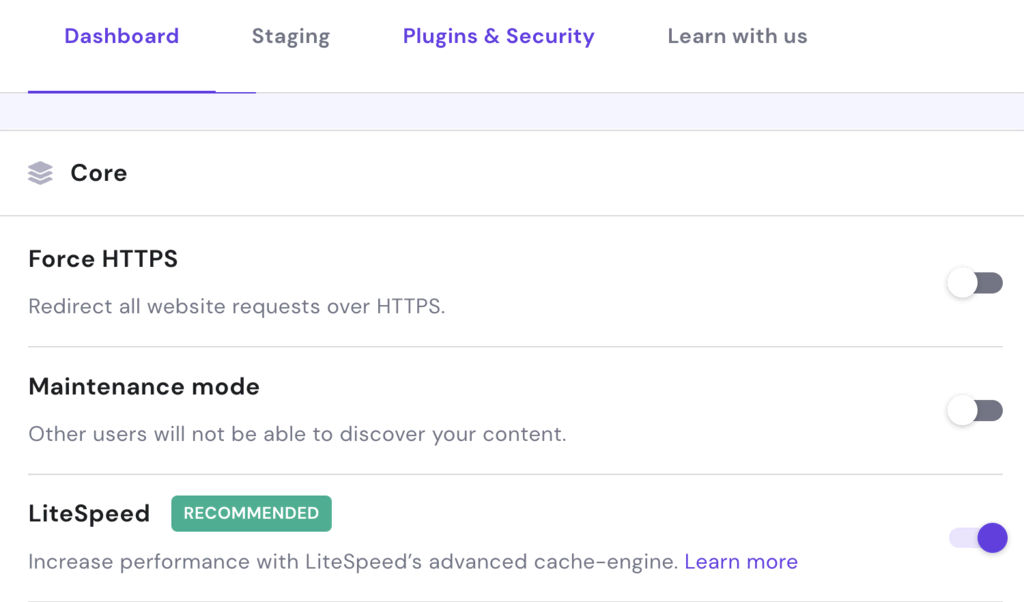
- Under the Dashboard menu, find the LiteSpeed settings option and turn it on.
- Log in to your WordPress website, and search for the LiteSpeed Cache plugin. Install and activate the plugin.
Recently LiteSpeed has introduced pre-defined official presets, which can help you further optimize the page load speed.
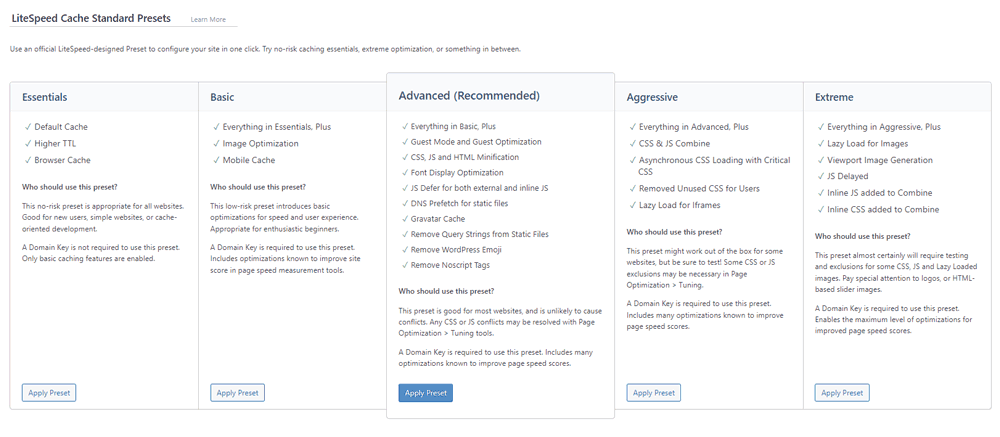
You can use one of these pre-defined presets to speed up the website. Also, if you understand caching, you can manually modify settings according to your needs.
Fix Initial Server Response Time on Bluehost
Bluehost offers caching solutions that can help improve the speed and performance of your website. Here are some of the caching options available on Bluehost:
- Varnish Caching: Varnish is a powerful caching technology that can improve the speed of your website. It is available on Bluehost’s Pro and VPS hosting plans. Varnish caches frequently accessed content on your website, which can reduce the load on your server and improve the response time.
- Content Delivery Network (CDN): Bluehost offers free Cloudflare CDN integration that can improve the performance of your website by caching content on multiple servers worldwide. This can reduce the distance that content needs to travel, resulting in faster loading times.
- WordPress Caching: Bluehost offers a default WordPress caching mechanism you can use from your hosting account.
To enable caching on your Bluehost website, you can follow these steps:
- Log in to your Bluehost account and navigate to the “My Sites” section.
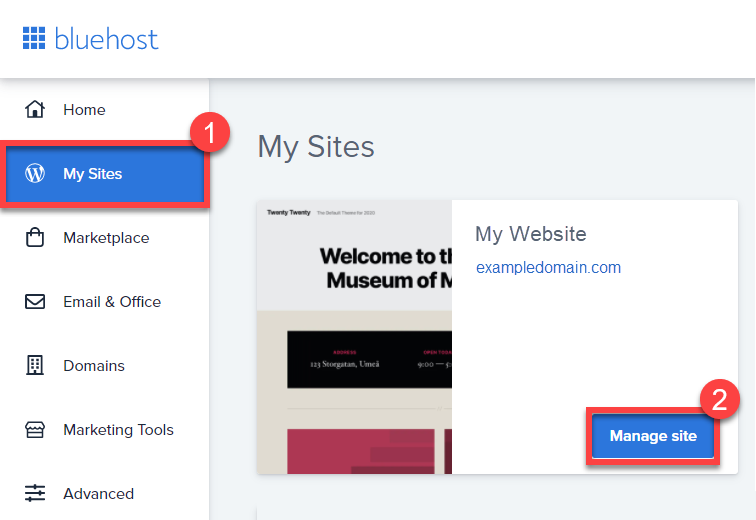
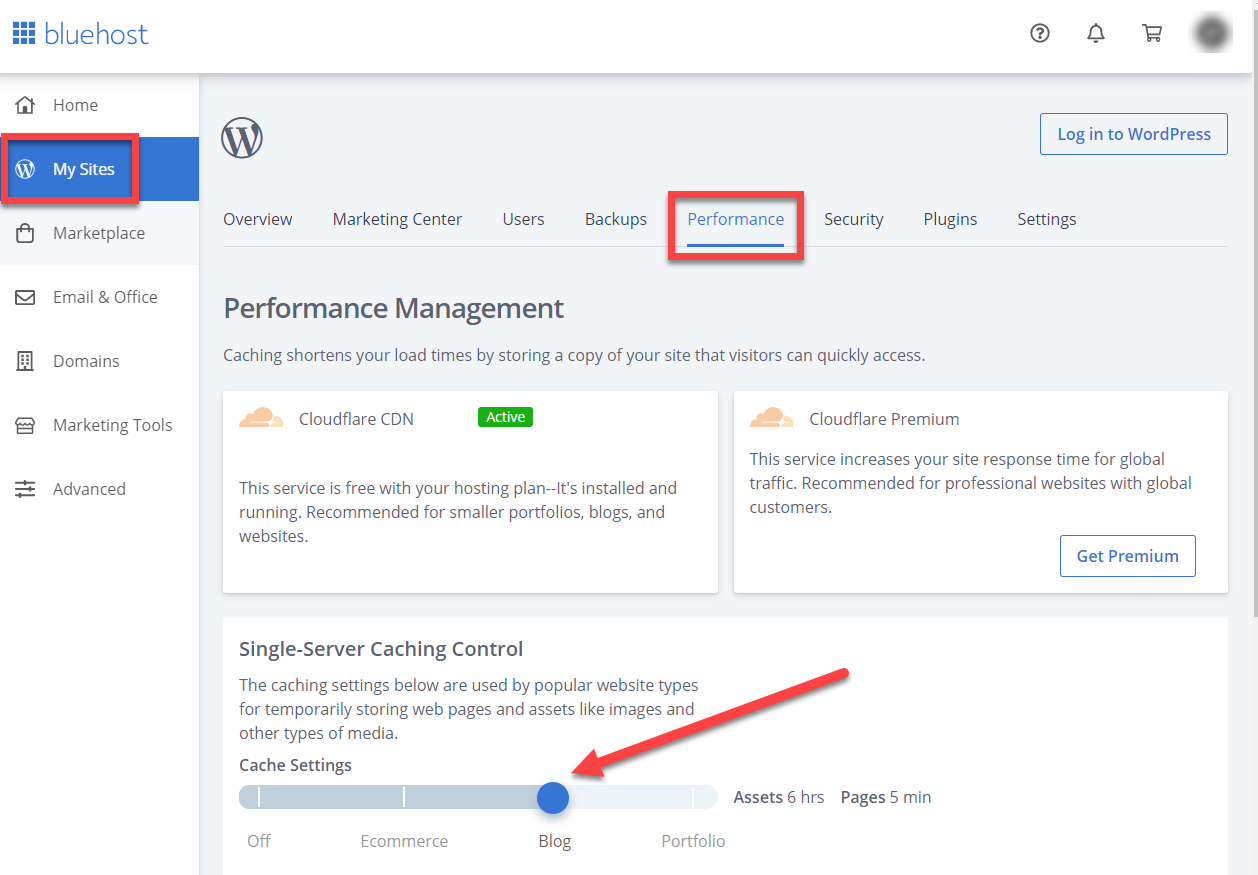
Note that enabling caching on your website can significantly impact your website’s performance. However, testing your website after enabling caching is important to ensure everything works as expected.

