Last Updated on by Azib Yaqoob
Do you want to compress images without losing image quality?
Large image files take longer to load on the user’s end. They slow down your website, which affects user experience and SEO.
Image compression is essential to improve your website page load speed. Faster-loading websites tend to rank higher in search results. Using this image compression guide, you can easily resize an image without compromising its quality.
Why You Should Compress Images?
Every website these days uses high-resolution images to improve the user experience. However, those images could affect your website page load speed if you don’t compress them before uploading them.
Image compression allows you to reduce image file size. For example, you can compress high-quality photos from your phone, typically more than 1 MB in file size to less than 100 KB.
Compressed images load faster, improve user experience, and boost your on-page SEO.
Image compression is also crucial for WordPress speed optimization, as images take the most time to load on any website.
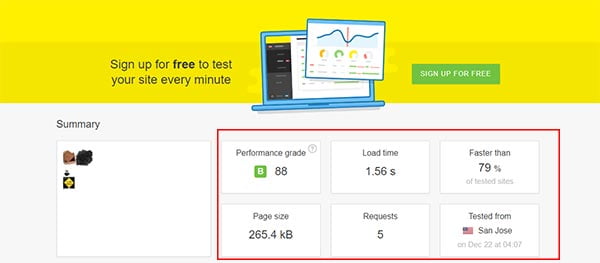
I performed a page speed test on a web page. First, I checked the page speed with unoptimized images. After that, I compressed images to smaller file sizes and re-ran the test.
Here are the results:
Before image optimization:
After image optimization:
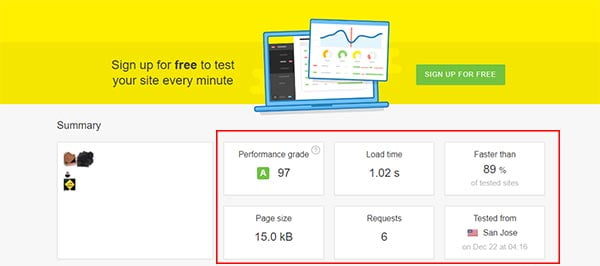
As you can see, this is a huge performance boost and makes a big difference in any website’s success.
How to Adjust and Resize Images?
There are two methods you can use to optimize images.
- Resize image resolution
- Compress the image to reduce its file size
Image resolution is the dimensions (width and height) of the image. It is calculated in pixels, for instance, 1200 pixels x 1200 pixels.
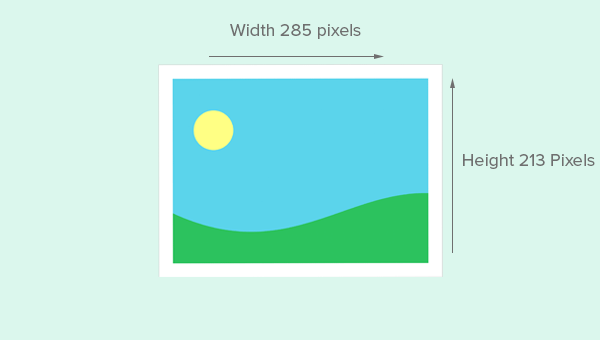
It also has pixel density settings depending on which device created or captured the image. Higher pixel density means a higher quality photo and larger size.
Your goal is to reduce the image resolution and file size.
Image resolution matters when it comes to image optimization. You have to adjust it according to your website content area.
For example, if your website content’s area has a height and width of 500px x 500px. you can reduce the image resolution to 500px x 500px using image editing software. Doing this will reduce the size of your image file.
Usually, most modern mobile phones save images in high resolution. These images are larger in every way. Hence, they are not suitable to be used on the web.
When compressing your images, you must also choose a reasonable resolution. If you are unsure about the width, select anything less than 1000px wide.
Resolution ensures that your image is still pleasant to see but not too large to slow down your website.
Compress Images Manually Before Uploading
If you want to compress an image before uploading it to your website, use the following image compression tools.
1. Adobe Photoshop (Paid)
Adobe Photoshop is one of the most used image editing software. It allows you to retain the maximum image quality while reducing its size simultaneously.
Using Photoshop, you can choose the image file format between JPEG or PNG. It will show a preview of the file size for each format. This way, you can select a file format that produces the best result.
Here is how you can optimize an image if you use Adobe Photoshop.
First, open the image you want to compress in Adobe Photoshop.
Click on File > Export > Save for web (legacy).
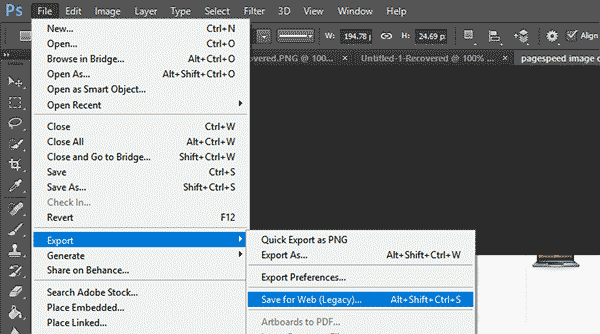
Now select JPG from the right corner of this new window.
Adjust quality as per your requirement.
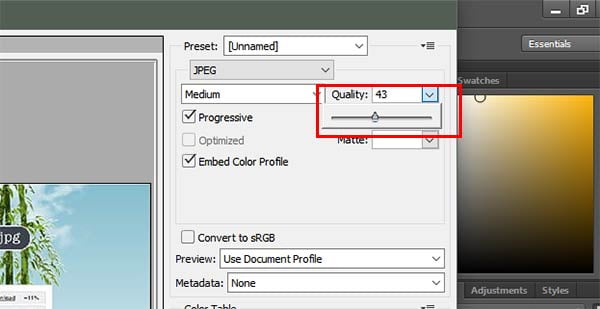
Colorful Images look good in JPG format, while you can compress images with fewer colors in PNG-8 or PNG-24 file formats.
Even in those formats, you can customize colors and image resolution., It should significantly reduce the image file size without losing quality.
You’ll be able to see the preview of the compressed image and the file size in the bottom left corner of the preview window.
If you reduce the file size much, this will affect the quality of the image. You need to keep the balance between quality and acceptable image file size.
For instance, I keep image file sizes under 100 KB max on my blogs. It always helps with faster page loading.
However, if you run a photography business or graphic design agency, you might want your website to have a much higher quality of images.
The great thing about using software like Adobe Photoshop is that you can try different combinations and see previews before saving your image.
Adobe Photoshop is expensive software, and it’s not affordable for everyone. The following method would suit those looking for free image compression software.
2. GIMP (Free)
GIMP is a free, open-source image editing software for Windows, Linux, and Mac operating systems.
Here’s how to use this free software to compress your images.
Open any image in GIMP, then click File > Export as.
Click the Export button, which will open a new window.
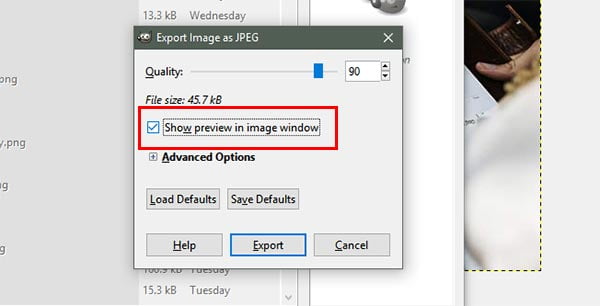
You can reduce the image quality as much as you want. Clicking on Show Preview in image window will give you an estimated file size.
Try different image file types and compression settings to find the best result. After some practice, you’ll get used to saving your images optimized for the web by default.
3. Compress Images with TinyJPG (Online/free)
TinyJPG is an online free image compression tool. One benefit of using TinyJPG is you can compress multiple images in one go.
How to Compress image to 100kb Online with TinyJPG
Visit the TinyJPG website and start uploading your images.
It will start compressing your images on the cloud, and you can download them to your computer.
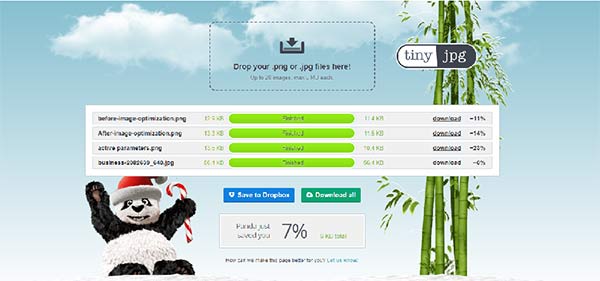
That’s it! Without any quality loss, you can compress images. The ideal image size for the web is less than 100 KB, mainly if your website loads multiple images at once.
They also have a sister site called TinyPNG that helps you shrink PNG images without losing quality.
Automatically Compress Images on WordPress
If you have already uploaded images on your website without optimizing them, you can still compress them without losing their quality.
1. Smush: WordPress Image Compression Plugin
Smush is a free WordPress image compression plugin. It has over a million users and thousands of five-star reviews.
It simply optimizes your images when you upload them to your WordPress website. You can also compress old photos in bulk.
Install the Smush plugin on your website.
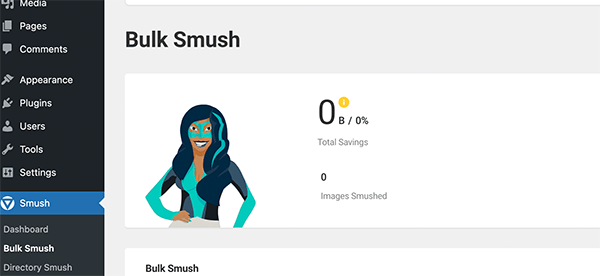
After that, click on the Smush icon in the WordPress admin sidebar and choose the Bulk Optimize option.
2. EWWW Image Optimizer
EWWW is an excellent alternative to the Smush WordPress image compression plugin.
First, download the EWWW Image Optimizer plugin to your WordPress website.
Go to Media > Bulk Optimize.
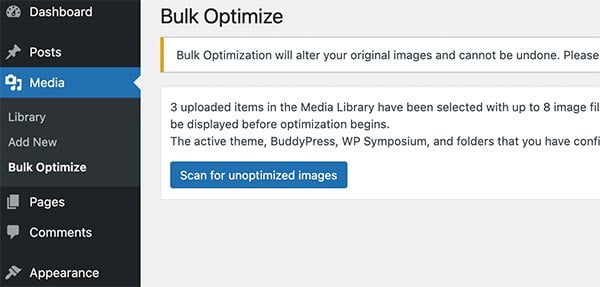
Click on Scan for unoptimized images.
It will take some time to scan. After completing the scan, click on Start Optimizing.
How to Compress Images in Next-gen Formats?
Using WordPress, you can easily convert your existing JPEG and PNG images into next-gen image formats.
What is a next-gen image Format?
You must have read about the next-gen image format while using Google’s page speed Insights.
Google recommends compressing images in size using next-gen formats such as JPEG 2000, JPEG XR, and WebP.
These formats compress your JPEG and PNG images further without affecting quality.
Google is right about that. However, next-gen image formats are still not widely used on the web. It is hard to find photos in “next-gen” formats.
If you use WordPress as your CMS, you can use a third-party plugin to convert your existing JPEG and PNG images into webP format.
You can install a plugin, WebP Express. Here’s how to install this plugin.
- Login to your WordPress site. Go to Plugins.
- Click the Add New button. Search for ‘WebP Express.’
- Install and Activate the plugin.
After that, existing images on your site will use WebP format. If a user’s browser doesn’t support WebP format, this plugin will show them an original JPG or PNG image.
That’s it! Hopefully, this guide helped you compress images. You can also maximize loading times by using a WordPress caching plugin.

