Last Updated on by Azib Yaqoob
Online booking is an essential feature for many small businesses, including restaurants, salons, repair services, and more. With WordPress, integrating online booking functionality is straightforward, thanks to a wide range of plugins designed for this purpose. This tutorial will walk you through the step-by-step process of adding online booking features to your WordPress website.
Table of Contents
Step 1: Understand Your Booking Needs
Before diving into the technical setup, consider what your business requires:
- Type of Appointments: Will you allow bookings for specific time slots or full-day services?
- User Features: Should users be able to cancel or reschedule appointments?
- Payment Integration: Will you collect payments during the booking process?
- Calendar Syncing: Should the bookings sync with external calendars like Google Calendar?
Popular WordPress plugins offer diverse features, so having a clear idea of your needs will help you pick the right one.
Need help setting up online booking for your WordPress site? Contact me today for a free consultation!
Step 2: Choose the Right Plugin
There are many WordPress booking plugins available, each catering to different requirements. Here are some popular options:
- Amelia: A premium plugin suitable for businesses requiring robust features like payment integration and employee management.
- Bookly: Another powerful option, perfect for businesses wanting automated notifications and payment processing.
- WP Simple Booking Calendar: Ideal for simpler scheduling needs, like room or equipment rentals.
- WooCommerce Bookings: Great for e-commerce businesses already using WooCommerce.
- Appointment Booking by MotoPress: A flexible, beginner-friendly option.
For this tutorial, we’ll use the Bookly plugin, as it balances advanced features with ease of use.
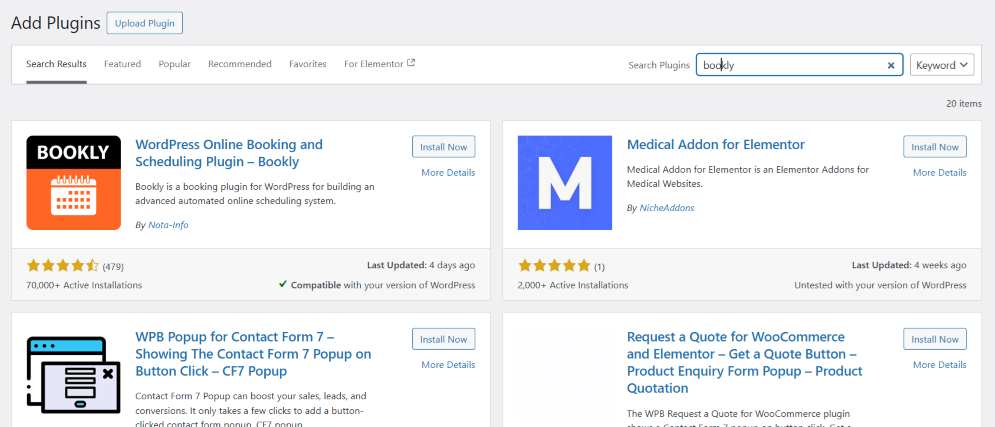
Step 3: Install and Activate the Plugin

- Log in to your WordPress Dashboard.
- Navigate to Plugins > Add New in the left-hand menu.
- Search for “Bookly” in the plugin search bar.
- Click Install Now next to the plugin and wait for the process to complete.
- After installation, click Activate to enable the plugin on your site.
Step 4: Configure the Plugin
Once activated, you’ll find the Bookly plugin settings in your WordPress dashboard.

1. Set Up Your Services
- Go to Bookly > Services.
- Click Add Service and enter details such as the name of the service, duration, and price.
- Assign services to specific staff members if needed.

2. Add Staff Members
- Navigate to Bookly > Staff Members.
- Add individual staff profiles, which users can choose from during the booking process.
3. Customize Time Slots
- Under Bookly > Schedule, define your availability, such as workdays, time slots, and break periods.
4. Payment Settings
- Go to Bookly > Settings > Payments.
- Enable payment gateways like PayPal or Stripe to allow users to pay during the booking process.
Step 5: Integrate Booking Forms on Your Website
Now that the plugin is configured, it’s time to add the booking form to your website.
1. Create a New Page for Bookings
- Navigate to Pages > Add New in your WordPress dashboard.
- Title the page something like “Book an Appointment” or “Schedule a Service.”
2. Insert the Booking Form
- Use the Bookly Shortcode available in the plugin settings:
[bookly-form] - Paste this shortcode into the page content editor.
3. Publish the Page
- Click Publish to make the page live.
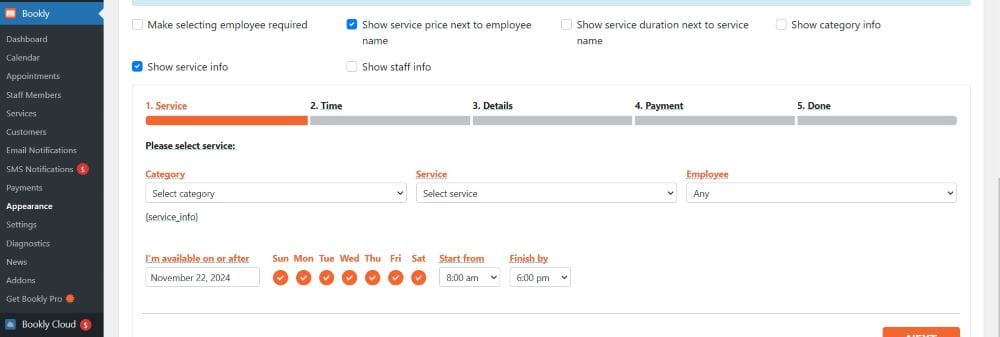
Step 6: Customize the Booking Form Appearance
Bookly allows you to adjust the design of your booking forms to match your website’s branding.

- Go to Bookly > Appearance.
- Choose form colors, fonts, and layouts.
- Preview the changes to ensure they fit seamlessly into your website’s theme.
Step 7: Test the Booking System
Before launching, thoroughly test the booking process to ensure it’s functioning correctly.
Steps to Test:
- Navigate to your booking page.
- Select a service, staff member (if applicable), and date.
- Proceed through the booking steps, including payment if enabled.
- Verify email or SMS notifications for bookings (if configured).
Step 8: Promote Your Booking Feature
Once your booking system is live, let your audience know!
- Homepage Announcement: Add a prominent call-to-action (CTA) on your homepage, such as “Book Now.”
- Social Media: Share the new feature with your followers on platforms like Facebook or Instagram.
- Email Marketing: Send a newsletter announcing the booking feature to your mailing list.
- Google Business Profile: Include a link to your booking page in your Google profile.
Step 9: Monitor and Maintain Your Booking System
- Check Regularly: Ensure that the plugin and WordPress are updated to their latest versions to avoid security vulnerabilities.
- Backup Data: Regularly back up your website, including booking information.
- Review Analytics: Monitor booking data to understand customer behavior and adjust services accordingly.
Additional Tips for Success
- Mobile Responsiveness: Ensure your booking form works smoothly on mobile devices.
- SEO Optimization: Use SEO best practices on your booking page to make it easier for users to find your services. For example, include relevant keywords like “online booking WordPress plugin tutorial” in your page title and meta description.
- Customer Support: Include a contact form or chatbot to assist users who encounter issues while booking.
Wrapping Up
Need help setting up online booking for your WordPress site? Contact me today for a free consultation!
Adding online booking features to your WordPress website is a powerful way to streamline your business and provide a convenient experience for your customers. With the Bookly plugin (or another plugin of your choice), you can easily create a system that aligns with your business needs.
